A block devices is usually a physical device that's used for storing data, e.g. Hard drives and solid state drives. A partition is basically a way to organise a block device's storage into smaller segments, that means creating partitions allows you to use a percentage of your block device's storage space for a specific purpose and leave the rest available for other uses. If you want to use all the storage of a block device for a particular purpose, then you don't need to create partitions.
A partition can be used in lots of different ways. One of the common ways is to use it as an ordinary filesystem. There are 3 steps you can do this:
- Create the partition - this is done using the "fdisk" tool. We'll cover how to do this in this article.
- Format the partition - This is also known as installing a filesystem. It is done using the "mkfs" command
- Mount the partition - done using the "mount" tool (and automate it by updating the fstab config file)
We have created a vagrant project on github to follow along this example.
We can see what block devices we have attached to our system using the lsblk command:
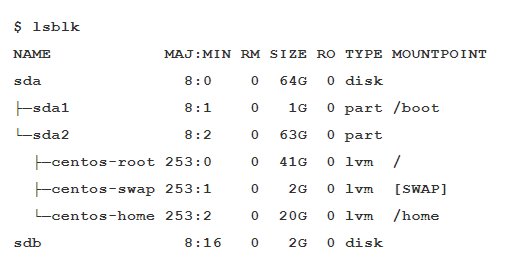
Here we have 2 block devices (as indicated by the disk label), sda and sdb. In this example, sda is made up of 2 partitions, sda1 and sda2. At the moment sdb doesn't have any partitions, however it might contain data. You can check if that's the case using the blkid command:
$ blkid
/dev/sda1: UUID="9e33c3c1-98df-4fe1-a66f-13ffbaa5f154" TYPE="xfs"
/dev/sda2: UUID="jE1A3D-X4dw-pi2u-BYxC-fvoQ-vVtn-R25igD" TYPE="LVM2_member"
/dev/mapper/centos-root: UUID="9e702351-4e25-449a-a586-9d713265a6e2" TYPE="xfs"
/dev/mapper/centos-swap: UUID="ae39ba11-dadd-498b-a279-04aaee5abe2c" TYPE="swap"
/dev/mapper/centos-home: UUID="1d84b924-8491-4e8a-9476-b969bfc5de2e" TYPE="xfs"
Since sdb isn't listed here, it means that sdb doesn't have a filesystem installed on it and therefore it's an empty block device. The block devices are represented as files in the /dev directory. Block devices are indicated by the letter ‘b':
$ ll /dev/ | grep '^b'
brw-rw----. 1 root    disk    253,   0 Mar 29 16:23 dm-0
brw-rw----. 1 root    disk    253,   1 Mar 29 16:23 dm-1
brw-rw----. 1 root    disk    253,   2 Mar 29 16:23 dm-2
brw-rw----. 1 root    disk      8,   0 Mar 29 16:23 sda
brw-rw----. 1 root    disk      8,   1 Mar 29 16:23 sda1
brw-rw----. 1 root    disk      8,   2 Mar 29 16:23 sda2
brw-rw----. 1 root    disk      8,  16 Mar 29 16:23 sdb
Note the dm-x devices are note partitions or block devices. They are actually file representations of logical volumes (see the content of ‘/dev/mapper/' directory). A partition's name is the same as it's parent block device followed by a number, e.g. sda1 and sda2.
So far we have seen that there are no partitions (e.g. sdb1, sdb2, sdb3…etc) created from sdb, and sdb isn't being used for anything else. We can start using sdb as a whole block device or we can use a part of sdb for a specific purpose, by creating partitions. In our case we will created several partitions from sdb1 and sdb2.
Partitions are created using the fdisk command. First off, the fdisk command can be used to give a detailed overview of our block devices, partitions, and logical volumes:
$ fdisk -l

Disk /dev/sda: 68.7 GB, 68719476736 bytes, 134217728 sectors
Units = sectors of 1 * 512 = 512 bytes
Sector size (logical/physical): 512 bytes / 512 bytes
I/O size (minimum/optimal): 512 bytes / 512 bytes
Disk label type: dos
Disk identifier: 0x000bfd84

   Device Boot      Start         End      Blocks   Id  System
/dev/sda1   *        2048     2099199     1048576   83  Linux
/dev/sda2         2099200   134217727    66059264   8e  Linux LVM

Disk /dev/sdb: 2147 MB, 2147483648 bytes, 4194304 sectors
Units = sectors of 1 * 512 = 512 bytes
Sector size (logical/physical): 512 bytes / 512 bytes
I/O size (minimum/optimal): 512 bytes / 512 bytes


Disk /dev/mapper/centos-root: 44.0 GB, 44006637568 bytes, 85950464 sectors
Units = sectors of 1 * 512 = 512 bytes
Sector size (logical/physical): 512 bytes / 512 bytes
I/O size (minimum/optimal): 512 bytes / 512 bytes


Disk /dev/mapper/centos-swap: 2147 MB, 2147483648 bytes, 4194304 sectors
Units = sectors of 1 * 512 = 512 bytes
Sector size (logical/physical): 512 bytes / 512 bytes
I/O size (minimum/optimal): 512 bytes / 512 bytes


Disk /dev/mapper/centos-home: 21.5 GB, 21483225088 bytes, 41959424 sectors
Units = sectors of 1 * 512 = 512 bytes
Sector size (logical/physical): 512 bytes / 512 bytes
I/O size (minimum/optimal): 512 bytes / 512 bytes
Also if you just want info about a particular resource, e.g. sda2, then do:
$ fdisk -l /dev/sda1

Disk /dev/sda1: 1073 MB, 1073741824 bytes, 2097152 sectors
Units = sectors of 1 * 512 = 512 bytes
Sector size (logical/physical): 512 bytes / 512 bytes
I/O size (minimum/optimal): 512 bytes / 512 bytes
fdisk main function is that it is an interactive tool to create/manage/delete partitions. So to start creating partitions from sdb, we do:
$ fdisk /dev/sdb
Welcome to fdisk (util-linux 2.23.2).

Changes will remain in memory only, until you decide to write them.
Be careful before using the write command.

Device does not contain a recognized partition table
Building a new DOS disklabel with disk identifier 0x2f383010.

Command (m for help):
Note, the warning message, this is expected since it is a new hdd that hasnt been partitioned yet.
If we select the "m" option, we get:
Command (m for help): m
Command action
   a   toggle a bootable flag
   b   edit bsd disklabel
   c   toggle the dos compatibility flag
   d   delete a partition
   g   create a new empty GPT partition table
   G   create an IRIX (SGI) partition table
   l   list known partition types                      # useful
   m   print this menu
   n   add a new partition                             # useful
   o   create a new empty DOS partition table
   p   print the partition table                       # useful
   q   quit without saving changes
   s   create a new empty Sun disklabel
   t   change a partition's system id                  # needed when creating LVMs
   u   change display/entry units
   v   verify the partition table
   w   write table to disk and exit                    # useful
   x   extra functionality (experts only)

Command (m for help):
Now, let's try to (p)rint the partition table for our new device:
Command (m for help): p

Disk /dev/sdb: 2206 MB, 2206806016 bytes, 4310168 sectors
Units = sectors of 1 * 512 = 512 bytes
Sector size (logical/physical): 512 bytes / 512 bytes
I/O size (minimum/optimal): 512 bytes / 512 bytes
Disk label type: dos
Disk identifier: 0x2f383010

   Device Boot      Start         End      Blocks   Id  System

Command (m for help):
At the moment this table is currently empty. That's because the data that the "p" option displays is actually stored in a special internal partition where the MBR resides. This internal partition is very small, i.e. less than 1kb in size, and it holds information about the partition setup for the rest of the hdd. But since this is a blank new device, it's doesn't even have this special internal partition either.
Now let's use option "n" start creating a new partition:
Command (m for help): n
Partition type:
   p   primary (0 primary, 0 extended, 4 free)
   e   extended
Select (default p):
At this point you'll discover that there are different types of partitions.
Primary, Extended, and Logical partition types
You can only create up to a maximum of 4 partitions on a given hdd. This limit is caused by the fact that the MBR's partition is only 1-2 kb in size and hence can't hold information for more than 4 partitions. As a way to overcome this restriction, the concept of Primary/Extended/Logical partitions was introduced.
Primary partition - These are the convention partitions that would create by default. If you only plan to create 4 partitions or less, then you only need to create primary partition and you don't have to worry about extended and logical partitions.
Extended partition - If you want to create more than 4 partitions on a hdd, now or in the future, then you need to create one of the partition as an extended partition. An extended partition is not actually a partition, instead it is essentially an empty container inside which you can create (logical) partitions. You cannot store data inside an extended partition directly, instead you first have to create logical partition inside the extended partition. You can only create one extended partition per hdd
logical partition - These are the names of any partitions created inside an extended partition. OS uses logical partitions in the same was as a typical primary partition
Best practice tip: You should always create an extended partition in the off chance that you might need to have more than 4 partitions.
In my case, I'll create my first primary partition which is going to be 10MB in size.:
Command (m for help): n
Partition type:
   p   primary (0 primary, 0 extended, 4 free)
   e   extended
Select (default p):
Using default response p
Partition number (1-4, default 1):
First sector (2048-4310167, default 2048):
Using default value 2048
Last sector, +sectors or +size{K,M,G} (2048-4310167, default 4310167): +10M
Partition 1 of type Linux and of size 10 MiB is set
Notice that that the first sector start at 2048 rather than 0. That's because the 0-2047 is reserved for setting up the MBR's special internal partition.
Now if we view the partition table again we have:
Command (m for help): p

Disk /dev/sdb: 2206 MB, 2206806016 bytes, 4310168 sectors
Units = sectors of 1 * 512 = 512 bytes
Sector size (logical/physical): 512 bytes / 512 bytes
I/O size (minimum/optimal): 512 bytes / 512 bytes
Disk label type: dos
Disk identifier: 0x2f383010

   Device Boot      Start         End      Blocks   Id  System
/dev/sdb1            2048       22527       10240   83  Linux
Note, this hasn't been set yet, we have to use the "w" option to apply the changes. At this stage it is just showing what would happen if we select the "w" option.
Let's now repeat the process to create 3 10MB primary partitions in total, after which our partition table now looks like:
Command (m for help): p

Disk /dev/sdb: 2206 MB, 2206806016 bytes, 4310168 sectors
Units = sectors of 1 * 512 = 512 bytes
Sector size (logical/physical): 512 bytes / 512 bytes
I/O size (minimum/optimal): 512 bytes / 512 bytes
Disk label type: dos
Disk identifier: 0x2f383010

   Device Boot      Start         End      Blocks   Id  System
/dev/sdb1            2048       22527       10240   83  Linux
/dev/sdb2           22528       43007       10240   83  Linux
/dev/sdb3           43008       63487       10240   83  Linux

Command (m for help):
Let's go ahead and create an extended partition now:
Command (m for help): n
Partition type:
   p   primary (3 primary, 0 extended, 1 free)
   e   extended
Select (default e):                             # notice that the default is now "e", which is nice.
Using default response e
Selected partition 4
First sector (63488-4310167, default 63488):
Using default value 63488
Last sector, +sectors or +size{K,M,G} (63488-4310167, default 4310167): +1024M        # tip: leave this blank!
Partition 4 of type Extended and of size 1 GiB is set

Command (m for help):
Since our extended partition is a container for other partitions, I have set this too 1GB in size.
Tip: best to leave the last sector blank, so that you fully use up your hdd's remaining available space.
Now if we try to create yet another partition, then fdisk is smart enough to automatically default to creating a logical partition now:
Command (m for help): n
All primary partitions are in use
Adding logical partition 5
First sector (65536-2160639, default 65536):
Using default value 65536
Last sector, +sectors or +size{K,M,G} (65536-2160639, default 2160639): +10M
Partition 5 of type Linux and of size 10 MiB is set

Command (m for help):
let's do this a couple more times so that we have 3 logical partitions in total, then let's see the partition table again:
Command (m for help): p

Disk /dev/sdb: 2206 MB, 2206806016 bytes, 4310168 sectors
Units = sectors of 1 * 512 = 512 bytes
Sector size (logical/physical): 512 bytes / 512 bytes
I/O size (minimum/optimal): 512 bytes / 512 bytes
Disk label type: dos
Disk identifier: 0x2f383010

   Device Boot      Start         End      Blocks   Id  System
/dev/sdb1            2048       22527       10240   83  Linux
/dev/sdb2           22528       43007       10240   83  Linux
/dev/sdb3           43008       63487       10240   83  Linux
/dev/sdb4           63488     2160639     1048576    5  Extended
/dev/sdb5           65536       86015       10240   83  Linux
/dev/sdb6           88064      108543       10240   83  Linux
/dev/sdb7          110592      131071       10240   83  Linux

Command (m for help):
As you can see, the Id/System for all our primary/logical partitions has defaulted to 83/Linux, . Use option "l" to view the full list of partition types:
Command (m for help): l

 0  Empty           24  NEC DOS         81  Minix / old Lin bf  Solaris
 1  FAT12           27  Hidden NTFS Win 82  Linux swap / So c1  DRDOS/sec (FAT-
 2  XENIX root      39  Plan 9          83  Linux           c4  DRDOS/sec (FAT-
 3  XENIX usr       3c  PartitionMagic  84  OS/2 hidden C:  c6  DRDOS/sec (FAT-
 4  FAT16 <32M      40  Venix 80286     85  Linux extended  c7  Syrinx
 5  Extended        41  PPC PReP Boot   86  NTFS volume set da  Non-FS data
 6  FAT16           42  SFS             87  NTFS volume set db  CP/M / CTOS / .
 7  HPFS/NTFS/exFAT 4d  QNX4.x          88  Linux plaintext de  Dell Utility
 8  AIX             4e  QNX4.x 2nd part 8e  Linux LVM       df  BootIt
 9  AIX bootable    4f  QNX4.x 3rd part 93  Amoeba          e1  DOS access
 a  OS/2 Boot Manag 50  OnTrack DM      94  Amoeba BBT      e3  DOS R/O
 b  W95 FAT32       51  OnTrack DM6 Aux 9f  BSD/OS          e4  SpeedStor
 c  W95 FAT32 (LBA) 52  CP/M            a0  IBM Thinkpad hi eb  BeOS fs
 e  W95 FAT16 (LBA) 53  OnTrack DM6 Aux a5  FreeBSD         ee  GPT
 f  W95 Ext'd (LBA) 54  OnTrackDM6      a6  OpenBSD         ef  EFI (FAT-12/16/
10  OPUS            55  EZ-Drive        a7  NeXTSTEP        f0  Linux/PA-RISC b
11  Hidden FAT12    56  Golden Bow      a8  Darwin UFS      f1  SpeedStor
12  Compaq diagnost 5c  Priam Edisk     a9  NetBSD          f4  SpeedStor
14  Hidden FAT16 <3 61  SpeedStor       ab  Darwin boot     f2  DOS secondary
16  Hidden FAT16    63  GNU HURD or Sys af  HFS / HFS+      fb  VMware VMFS
17  Hidden HPFS/NTF 64  Novell Netware  b7  BSDI fs         fc  VMware VMKCORE
18  AST SmartSleep  65  Novell Netware  b8  BSDI swap       fd  Linux raid auto
1b  Hidden W95 FAT3 70  DiskSecure Mult bb  Boot Wizard hid fe  LANstep
1c  Hidden W95 FAT3 75  PC/IX           be  Solaris boot    ff  BBT
1e  Hidden W95 FAT1 80  Old Minix

Command (m for help):
The ones highlighted above are most commonly used. Here is a summary of each of these:
- 5/extended - this is an extended partition.
- 83/Linux - this is the default and indicates that this partition will be used for installing a standard filesystem on it
- 8e/LVM - used for creating physical volumes
- Swap - Used for creating pseudo ram, covered later
Let's now go ahead, and apply our changes by saving this new partition table (using option "w") to the special internal mbr's partition.
Command (m for help): w
The partition table has been altered!

Calling ioctl() to re-read partition table.
Syncing disks.
[root@localhost dev]#
When using option "w" you might get the following error message:
Command (m for help): w
The partition table has been altered!

Calling ioctl() to re-read partition table.

WARNING: Re-reading the partition table failed with error 16: Device or resource busy.
The kernel still uses the old table. The new table will be used at
the next reboot or after you run partprobe(8) or kpartx(8)
Syncing disks.
IMPORTANT: When this happens, you may need to then reboot the machine for the changes to actually take affect.
Instead of rebooting the machine, you may be able to get away with just running the partprobe or partx commands, although doesnt always work.
$ whatis partx
partx (8)            - tell the Linux kernel about the presence and numbering of on-disk partitions
$ whatis partprobe
partprobe (8)        - inform the OS of partition table changes
Note: you don't need to restart your machine if fdisk has successfully applied the changes. You can check if the changes have already been applied by checking if the block device files exist:
$ ls -l /dev | grep "sdb"
brw-rw----. 1 root disk      8,  16 May 17 19:22 sdb
brw-rw----. 1 root disk      8,  17 May 17 19:22 sdb1
brw-rw----. 1 root disk      8,  18 May 17 19:22 sdb2
brw-rw----. 1 root disk      8,  19 May 17 19:22 sdb3
brw-rw----. 1 root disk      8,  20 May 17 19:22 sdb4
brw-rw----. 1 root disk      8,  21 May 17 19:22 sdb5
brw-rw----. 1 root disk      8,  22 May 17 19:22 sdb6
brw-rw----. 1 root disk      8,  23 May 17 19:22 sdb7
Another way to check is by using lsblk:
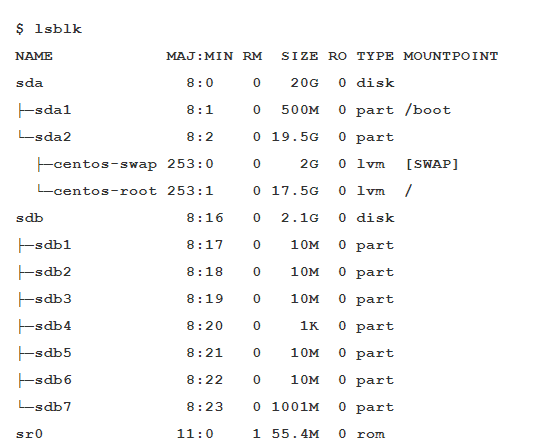
The lsblk shows a lot more info than just a list hdds/partitions, e.g. it shows which partition is being used as part of lvm, which partitions/HDD are currently mounted,...and etc.
Note: if you want to create a GPT based partition, then you need to use the "gdisk" command. The gdisk command works in a very similar way to the fdisk command.
On the job tip: It's difficult to automate fdisk by writing shell scripts, the option being the 'EOF' approach to simulate inputs into the interactive prompts. However the gdisk rpm comes with sgdisk which is a tool that's specifically designed for creating partitions using shell scripts.
Alternatives to fdisk
fdisk is actually quite an old tool and in fact it's already showing it's age, namely :
- It can't be used on block devices that are bigger than 2TB
- You can only create a maximum of 4 partitions. The fact that you can create extended+logical partitions is more of a workaround to the 4 partition limit
- You can only create partitions by using fdisk's interactive mode. Which means it's not that straight forward to create partitions via shell scripts. The only option being using the bash heredoc technique
That's why its better newer partition tools, namely gdisk and parted. For example gdisk let's you create a maximum of 128 partitions. gdisk supports block devices that are >2TB, and it has a dedicated utility for automating partitioning via shell scripts.
[post-content post_name=rhsca-quiz]
To create MBR based partitions for /dev/sdb
$ fdisk /dev/sdb
To create GPT based partitions for the device /dev/sdb
$ gdisk /dev/sdb
To refresh your partition tables
$ partprobe # or you can reboot your machine
types of partitions
3 types:
- primary partitions
- extended partitions
- logical partitions.
To list all storage devices in /dev
$ ls -l /dev | grep "^b"
3 steps to creating a partition and bring it into use
1 - Create the partition (using fdisk or gdisk)
2 - Format the partition (using mkfs)
3 - Mount the partition (using the "mount" tool)
command to display all your storage devices along with corresponding partitions in a visual tree structure
$ lsblk
Linux Index
⇰ Hardware and Software Considerations
⇰ VMWare Installation on Windows
⇰ Installation Methods and Types
⇰ CentOS Installation on VMWare
⇰ Ubuntu Installation on VMWare
⇰ Logical Volume Manager - LVM
⇰ Swap Partition Considerations
⇰ Other Partition Considerations
⇰ Adding and Configuring Peripherals
⇰ Printers
Linux Tutorial
Linux Directories
- ⇨Linux Directories
- ⇨Linux pwd
- ⇨Linux cd
- ⇨Linux Absolute Relative
- ⇨Linux Path Completion
- ⇨Linux ls
- ⇨Linux mkdir
- Linux rmdir
Linux Files
⇨Linux Man Pages
Linux File Contents
Linux File Hierarchy
- Linux File Hierarchy
- Binary Directories
- Configuration Directories
- Data Directories
- Memory Directories
- Usr Directory
- var Directory
- Non-standard directories
12 Linux Filters
- Linux Filters
- Linux cat
- Linux cut
- Linux grep
- Linux comm
- Linux sed
- Linux tee
- Linux tr
- Linux uniq
- Linux wc
- Linux od
- Linux sort
- Linux gzip
Linux I/O Redirection
Linux Unix Tools
Linux Regex
Linux Users
Linux File Security
- Linux File OwnerShip
- Linux Permission
- Linux Advance Permission
- Linux File Links
- Linux Inodes
- 2) Linux Link Directories
- Linux Hard links
- Linux Soft links
- Linux Remove link
Linux Shell Commands
- Linux Commands
- Linux Aliases
- Linux Arguments
- Linux Displaying Shell
- Linux Control Operators
- 1) Semicolon
- 2) Ampersand
- 3) Dollar Question Mark
- 4) Double Ampersand
- 5) Double Vertical Bar
- 6) Combining && and ||
- 7) Pound Sign
- 8) ESC
- Linux File Globbing
- Linux Shell Embedding
- Linux Shell History
- Linux History Commands
- Linux Histroy Size
- Linux Bang Bang
Linux Networking
- Linux Networking
- 1) Linux ifconfig
- 2) Linux ip
- 3) Linux traceroute
- 4) Linux tracepath
- 5) Linux ping
- 6) Linux netstat
- 7) Linux ss
- 8) Linux dig
- 9) Linux nslookup
- 10) Linux route
- 11) Linux host
- 12) Linux arp
- 13) Linux iwconfig
- 14) Linux hostname
- 15) Linux curl & wget
- 16) Linux mtr
- 17) Linux whois
- 18) Linux ifplugstatus
Linux vi editor
- Vi Editor
- Vi Commands
- 1) switch
- 2) move
- 3) jump
- 4) delete
- 5) undo and repeat
- 6) cut, copy, paste
- 7) cut, copy, paste blocks
- 8) Start and end
- 9) Joining
- 10) word
- 11) Search
- 12) Replace all
- 13) Text Buffers
- 14) Abbreviations
Linux System Admin
- Linux Admin Commands
- Linux uptime
- Linux service
- Linux terminating
- 1) Linux kill
- 2) Linux killall
- 3) Linux pkill
- 4) Linux xkill
- Linux pmap
- Linux wget command
- wget <URL>
- wget -O <fileName> <URL>
- wget --limit-rate=<Numberk> <URL>
- wget -c <URL>
- wget -b <URL>
- wget --tries=<Number> <URL>
- wget -i <fileName>
- wget --mirror -p --convert-links -P ./local dir <webURL>
- wget --reject=<rejectingFile> <URL>
- wget -Q<Value>m -i <fileName>
- wget -r -A.<fileType> <webURL>
- wget -o <logFile> <URL>
- Linux ftp or sftp
- Linux free Command
- Linux top
- Linux last
- Linux ps
- Linux shutdown
- Linux info
- Linux env
- Linux du
- Linux init
- Linux Nano Editor
- Linux shred
- Linux mount
- Linux route
100+ Linux Commands
- 100+ Linux Commands
- bzip2 / bunzip2
- bzcat / bzmore
- cal
- cat
- cd
- comm
- cp
- cut
- date
- df
- file
- find
- grep
- gzip / gunzip
- head
- less
- locate
- ls
- man
- mkdir
- more
- mv
- od
- pwd
- rename
- rm
- rmdir
- sed
- sleep
- sort
- tac
- tail
- tee
- time
- touch
- tr
- uniq
- wc
- zcat / zmore
Interview Questions
The DevOps seminar will help you to learn DevOps from scracth to deep knowledge of various DevOps tools such as fallowing List.
Kubernetes.Learn Latest Technologies
DevOps
AWS
Python
Azure
G Cloud
Linux
Web Tech
Data Bases
Testing
Git
Ansible
Chef
Kubernetes
HTML
CSS